
We recently got involved in a very interesting project. We were asked to create a prototype custom app that could be used to control a set of lamps. To achieve this, we needed to find a switch that is part of the ‘internet of things’ (IoT), that we could communicate with from a custom app developed on the Claris/FileMaker Platform. The switch would be used to interrupt, or allow, the flow of electricity to each lamp, thus controlling the lamps.
We undertook some research into suitable IoT devices and eventually selected the BasicR3 switch that is manufactured by Sonoff. It has the features that we needed, namely:
- A Wi-Fi network connection.
- An HTTP-based RESTful API. (For an explanation of this phrase, please visit the Wikipedia pages for ‘RESTful‘ and ‘API‘.)
Configuring the Switches
We needed to control three lamps from the prototype custom app, so we set up a space with one bulb connected to each of three BasicR3 switches.

The test setup, consisting of three lights connected to three WiFi switches connected to three power supplies (which are not shown in the photo). Photo by Anthony Lambert. Photo of simple switch button at top of page by Szabo Viktor/Unsplash.
The three switches were connected to the Wi-Fi network. We used a network scanner to identify the switches on the network and to obtain their IP addresses. If we had been installing the lamps permanently we would have used the admin panel for our network router to allocate a reserved IP address to every switch. For our test purposes, however, this was not necessary; we simply noted down the current IP addresses.
Communicating with the Switches
When developing a custom app for controlling IoT devices, the core task is to code the connection between the custom app and the device. Before working on an interface in a custom app, we always test the connection with a tool that is built for the job. In our case, we tested every switch, and whether we could communicate with it, using a software tool that enabled us to create various HTTP requests and send them through APIs to the switches. The specific application that we used is called Paw, but another popular application that does the same job is Postman.
Using Paw, we first tested whether we could obtain information from every one of the three switches. To help us to compile the HTTP requests correctly, we used the page that Sonoff has dedicated to explaining its RESTful API.
This video shows how we got on:
A video showing the sending of a request through the Sonoff API. Video by Anthony Lambert.
After successfully getting information from every switch, we used Paw to send a request to turn each switch off, then turn each switch on again. This was also successful.
Now that we knew we could control the switches using Paw, we knew the structure of the HTTP requests that could implement that control. Our next task was to transfer those requests to our Claris/FileMaker-based custom app.
Our Claris/FileMaker-based Custom App
The script step that can be used to send HTTP requests is ‘Insert from URL’.
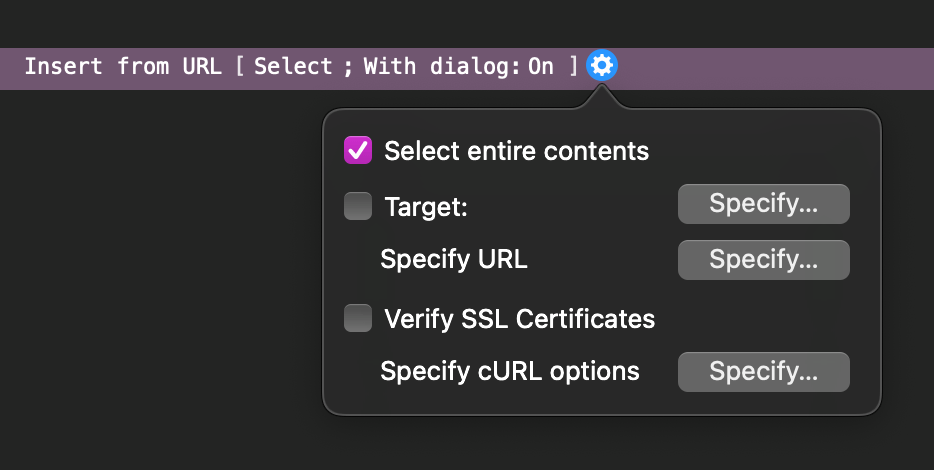
A screenshot of the ‘Insert from URL’ script step in Claris Pro and FileMaker Pro. Screenshot by Anthony Lambert.
The ‘Target’ for our purposes was a variable that can capture the result code returned from the HTTP request. In the script that contained this ‘Insert from URL’ script step, we evaluate the returned code and branch accordingly, displaying an error message if required.
From Paw, we knew that in ‘Specify URL’ we needed to enter ‘http://[IP Address 1]:8081/zeroconf/info’ as the URL for switch 1, where ‘[IP Address 1]’ is replaced with something like ‘10.0.1.15’, which represented the actual location of switch 1 on the network.
For our purposes, ‘Verify SSL Certificates’ was not needed.
For ‘Specify cURL options’, we needed to do some processing to convert the HTTP request we sent in Paw to a request that would work in Claris/FileMaker. In this we were helped enormously by some great work done by a Claris Partner based in USA called Proof+Geist. They developed an extension for Paw that does the majority of the conversion work for you.
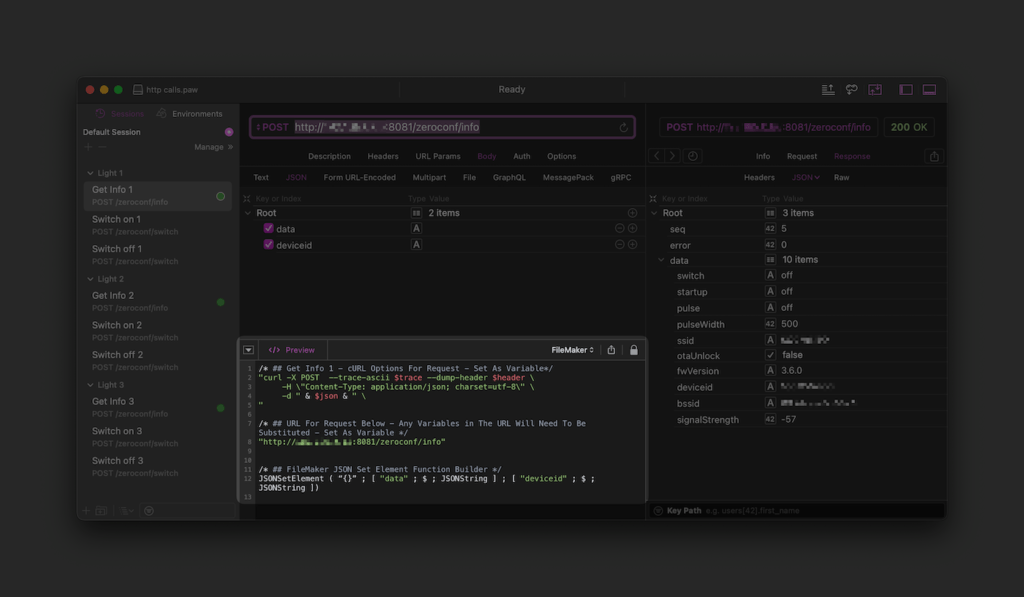
A screenshot of the FileMaker extension visible in the main window of the Paw application. Screenshot by Anthony Lambert.
To make the script easier to follow, edit and bug-fix, we used variables to store various elements of the ‘Insert from URL’ step. The resulting steps in the script looked like this:
Set Variable: $url =
"http://[IP Address]:8081/zeroconf/info"

Set Variable: $json =
JSONSetElement ( "{}" ;
    [ "data" ; "" ; JSONString ] ;
    [ "deviceid" ; "" ; JSONString ]
)

Set Variable: $curl =
"curl -X POST --trace-ascii $trace --dump-header $header \
    -H \"Content-Type: application/json; charset=utf-8\" \
    -d " & $json & " \
"

Insert from URL [ $result; $url; cURL options: $curl ] [ Select; No dialog ]
As you can see, these variables closely corresponded with the contents of the FileMaker extension in the Paw application. For more information about cURL, please see the cURL website and the Claris FileMaker 19 help page on supported cURL options.
Testing our Custom App
Now we were ready to test the custom app. We created a simple user interface (UI). This video shows the result of our test:
A video showing the test of turning lights on and off by a custom FileMaker application sending requests through the Sonoff API. Video by Anthony Lambert.
Conclusion
You can use a custom app developed on the Claris/FileMaker platform to control any IoT device. Provided a device uses an open method of communicating, such as a RESTful API, rather than a closed, proprietorial system, then connecting to that device is reasonably straightforward. Given the huge range of IoT devices that are available, the scope of what can be done with a custom app like this prototype is massive.